
Introduction to DIY Solar Panel Construction
Welcome to the fascinating world of DIY solar panel construction! In this guide, we will embark on an enlightening journey, unlocking the potential of solar energy by building a solar panel from scratch. This endeavor is not just about harnessing renewable energy; it’s also an empowering experience that combines learning, practical skill development, and environmental stewardship.
Why Build Your Own Solar Panel?
Building your own solar panel can be incredibly rewarding. It allows you to understand the intricacies of solar energy generation, and offers a sense of accomplishment that comes with creating a functional energy source with your own hands. Moreover, DIY solar projects can be cost-effective, providing a cheaper alternative to commercial solar panels while also offering the flexibility to customize the panel to your specific needs.
Is it Feasible for Beginners?
Yes, with the right guidance and resources, even beginners can undertake this project. It requires patience, a bit of technical know-how, and attention to detail, but it’s certainly achievable. The process involves basic electrical work and some manual crafting, but each step can be learned and executed with care.
Environmental Impact
Choosing to build a solar panel is a step towards sustainable living. Solar energy is clean, renewable, and has a significantly lower environmental impact compared to traditional fossil fuels. By adopting solar energy, you contribute to reducing carbon emissions and help in the fight against climate change.
Educational Value
This project is not just about building a solar panel; it’s a learning experience. It offers practical knowledge in areas such as basic electronics, energy conversion, and sustainable practices. This can be particularly educational for students, hobbyists, or anyone interested in renewable energy technologies.
Economic Benefits
In addition to environmental and educational advantages, constructing your own solar panel can lead to substantial cost savings. While the initial investment in materials is required, the long-term benefits include reduced electricity bills and potential incentives from renewable energy programs.
Gathering the Necessary Materials
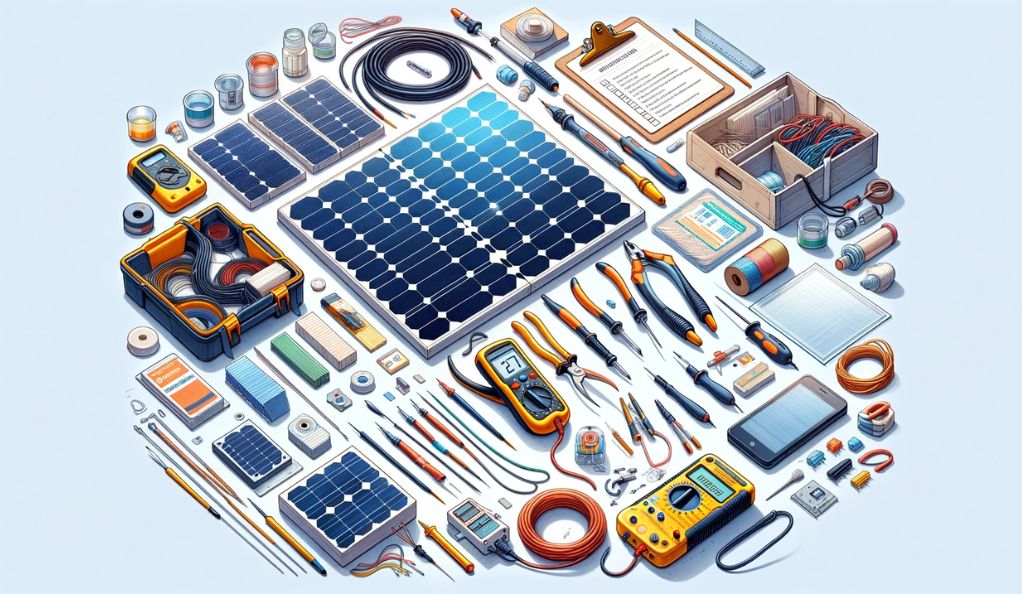
Embarking on the journey of building a solar panel from scratch, the first and foremost step is to gather all the necessary materials. This section provides a detailed list of items required, ensuring you have everything needed to successfully construct your solar panel.
Solar Cells: The Heart of Your Panel
- Type: Photovoltaic (PV) cells, preferably monocrystalline or polycrystalline.
- Quantity: The number depends on your desired panel size and power output. For a standard 100-watt panel, you’ll need about 36 cells.
Soldering Equipment: For Electrical Connections
- Soldering Iron: A basic 30-40 watt iron is sufficient.
- Solder: Lead-free solder is recommended for environmental safety.
- Flux Pen: To clean and prepare the surfaces for soldering.
Wiring Materials: To Create Connections
- Tabbing Wire: Thin, conductive wire for connecting individual solar cells.
- Bus Wire: Thicker wire for connecting rows of solar cells.
Backing Material: The Foundation
- Substrate Material: Plywood or a plastic sheet, cut to the size of your solar panel.
- Non-Conductive Glue: For attaching cells to the backing.
Encapsulation Material: For Protection
- Plexiglass or EVA Film: To cover and protect the solar cells.
- Silicone Caulk: To seal the edges and prevent moisture entry.
Additional Hardware: For Assembly and Installation
- Junction Box: To collect and transfer the solar energy.
- Blocking Diode: To prevent reverse current flow.
- Mounting Hardware: Brackets, screws, and nuts for installing the panel.
Tools and Equipment: For Construction and Testing
- Multimeter: To test the voltage and current of your panel.
- Drill: For making holes in the backing and frame.
- Screwdriver, Pliers, Wire Cutters: Basic tools for assembly.
Assembling Your Solar Cells
This section delves into the heart of solar panel construction – assembling the solar cells. This process is meticulous but rewarding, as it involves laying out the photovoltaic cells and connecting them to form the core of your solar panel. Each step is crucial and must be handled with care to ensure efficiency and longevity of your panel.
Layout Design
- Pattern: Arrange the solar cells in a grid pattern on your backing material. The layout should maximize space while ensuring cells are securely placed.
- Orientation: Cells must be aligned correctly; the positive terminal of one cell connects to the negative terminal of the next.
- Series Connection: This ensures that the voltage of each cell adds up, increasing the total voltage of the panel.
Handling Solar Cells
- Fragility: Solar cells are fragile. Handle them with care to avoid cracks or breakage.
- Cleanliness: Ensure the surface of each cell is clean before soldering to avoid connection issues.
Soldering Tabbing Wire
- Procedure: Solder tabbing wire along the conductive strips of each solar cell. This wire will interconnect the cells.
- Soldering Technique: Use a flux pen on the strips before soldering to improve the connection and prevent oxidation.
Connecting the Cells
- Series Connection: Connect the tabbing wire from the bottom of one cell to the top of the next, ensuring correct polarity.
- Testing Connections: After connecting each cell, use a multimeter to test the voltage to ensure proper connections.
Laying Cells on the Backing Material
- Gluing Cells: Use a non-conductive adhesive to fix each cell onto the backing material. Ensure they are firmly placed but not under pressure.
- Spacing: Leave adequate space between cells for expansion and contraction due to temperature changes.
Bus Wire Soldering
- Purpose: Bus wire is used to connect rows of solar cells.
- Soldering Process: Solder the bus wire across the connected tabbing wires at the ends of each row.
Wiring and Soldering Techniques
After the solar cells are assembled, the next critical step in building your solar panel is the wiring and soldering process. This stage requires precision and attention to detail, as proper electrical connections are crucial for the panel’s efficiency and safety. Here, we break down the process into clear, manageable steps.
Understanding the Basics of Solar Wiring
Series vs. Parallel Wiring:
- Series Wiring: In series wiring, the voltage of each solar cell adds up, but the current remains the same. This is ideal for increasing the total voltage of your solar panel.
- Parallel Wiring: Parallel wiring maintains the same voltage across all cells but adds up the current. It’s used when higher current is needed without increasing the voltage.
Deciding on Wiring Configuration:
Consider your energy needs and the specifications of your solar cells to decide whether series, parallel, or a combination of both is best for your panel.
Step-by-Step Soldering Guide
Preparing for Soldering:
- Ensure all surfaces are clean.
- Pre-apply flux to areas to be soldered, which helps improve the solder’s flow and connection.
Soldering Tabbing and Bus Wires:
- Use the soldering iron to heat the area and then apply the solder.
- For tabbing wires, solder them to the conductive strips of the solar cells.
- Connect the rows of cells with bus wires, ensuring solid and clean solder joints.
Checking Solder Joints:
- After soldering, check each joint to ensure it’s secure and has good electrical contact.
- Use a multimeter to test the continuity and voltage output of each connection.
Common Soldering Mistakes to Avoid
- Overheating the Cells: Excessive heat can damage solar cells. Use a soldering iron with an appropriate temperature setting.
- Cold Solder Joints: A joint that looks dull and isn’t smooth can indicate a cold solder joint, which may lead to poor electrical connection.
- Using Too Much Solder: Excessive solder can create bulky joints that may not fit well in the panel casing.
Building the Panel Box and Mounting
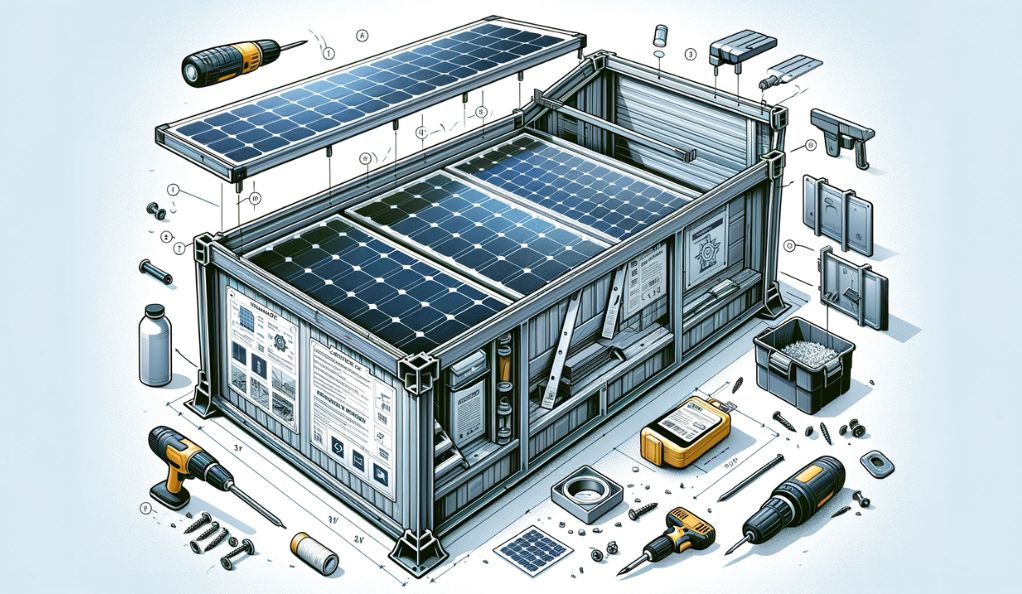
The construction of a durable and secure panel box is crucial for protecting your assembled solar cells. This stage involves creating an enclosure that shields the cells from environmental elements while ensuring optimal functioning. We will also discuss mounting methods to install your solar panel effectively.
Constructing the Panel Box
Choosing the Right Material:
- Substrate: Use a sturdy, weather-resistant material like plywood or aluminum as the base.
- Dimensions: Ensure the box is slightly larger than your solar cell assembly to accommodate all components comfortably.
Creating a Frame:
- Build a frame around the substrate to support the solar cells and the protective cover.
- Ensure the frame has enough depth to house the cells and the cover without pressing against them.
Installing the Cover:
- Use a transparent, durable material like Plexiglass or tempered glass as a cover.
- The cover should be securely attached to the frame while allowing sunlight to reach the solar cells.
Sealing and Waterproofing:
Apply silicone caulk around the edges to seal the box, preventing moisture and dust ingress.
Check for any gaps or holes and seal them adequately.
Mounting the Solar Panel
Selecting the Location:
- Choose a sunny, unshaded location for maximum solar exposure.
- Consider factors like roof strength (if mounting on a roof) and accessibility for maintenance.
Mounting Hardware:
- Use sturdy brackets and mounting hardware suitable for your chosen location.
- Ensure all hardware is weather-resistant and capable of supporting the panel’s weight.
Angle and Orientation:
- Position the panel at an optimal angle for your geographic location to maximize solar absorption.
- In general, panels should face true south in the Northern Hemisphere and true north in the Southern Hemisphere.
Securing the Panel:
- Attach the panel securely to the mounting hardware.
- Double-check all connections to ensure stability and safety.
Installing the Junction Box and Inverter
Once your solar panel is assembled and mounted, the next critical steps are installing the junction box and inverter. These components are essential for managing the electricity generated by your solar panel and integrating it into your home’s electrical system or battery storage.
Installing the Junction Box
Choosing the Right Junction Box:
Select a weatherproof junction box suitable for outdoor use.
Ensure it has enough terminals for the number of solar cells in your panel.
Positioning the Junction Box:
The junction box is typically installed on the back of the solar panel.
Position it close to the edge for easy wire routing and maintenance access.
Wiring to the Junction Box:
Connect the positive and negative bus wires from your solar cells to the corresponding terminals in the junction box.
Ensure that all connections are secure and properly insulated.
Sealing for Weatherproofing:
Use silicone sealant to seal around the edges of the junction box, preventing moisture ingress.
Choosing and Installing an Inverter
Inverter Types:
String Inverter: Suitable for larger installations with minimal shading.
Microinverters: Ideal for panels in partial shade, as they optimize each panel’s performance individually.
Location for Inverter Installation:
Install close to the solar panel for reduced energy loss.
Ensure the location is accessible, well-ventilated, and protected from direct sunlight and moisture.
Connecting the Inverter:
Wire the output from the junction box to the input of the inverter.
For microinverters, each panel will have its own inverter connected directly.
Grounding the System:
Proper grounding is crucial for safety. Ensure the solar panel, inverter, and junction box are all correctly grounded.
Electrical Safety and Compliance
Electrical Codes: Adhere to local electrical codes and standards.
Inspection: Have the installation inspected by a qualified electrician, if required.
Testing and Ensuring Panel Efficiency
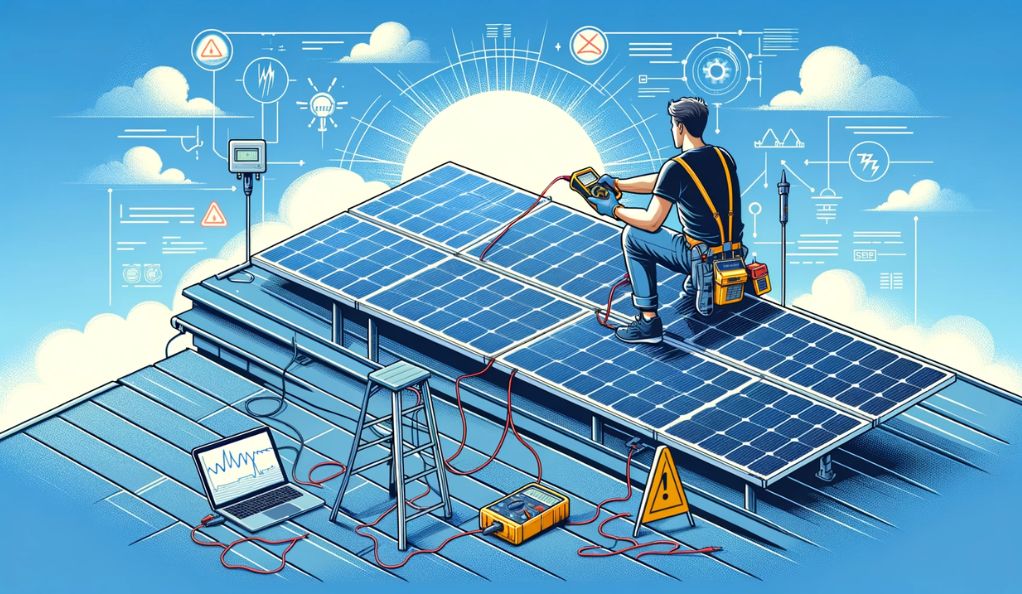
After assembling and installing your solar panel, it’s crucial to test its efficiency and functionality. This step ensures that all components are working correctly and your panel is ready for use. We will guide you through the testing process and highlight common mistakes to avoid.
How to Test Your Solar Panel
Using a Multimeter:
- Set your multimeter to measure DC voltage.
- Connect the positive lead to the positive terminal and the negative lead to the negative terminal of your solar panel.
- Measure the voltage output in full sunlight. It should be close to the rated voltage of your panel.
Checking Current Output:
- Switch the multimeter to measure DC current.
- Measure the current output under full sunlight conditions. The reading should align with the panel’s specifications.
Inspecting for Loose Connections:
- Visually inspect all solder joints and connections.
- Gently tug on wires to ensure they are securely attached.
Common Mistakes to Avoid
- Improper Angling: Ensure the panel is positioned at the correct angle to maximize sun exposure.
- Shading: Avoid placing the panel where it can be shaded by trees, buildings, or other obstructions.
- Dirt and Debris: Keep the panel surface clean for optimal performance.
Maintenance Tips
- Regular Cleaning: Dust and dirt can significantly reduce efficiency. Clean the panel surface regularly.
- Periodic Inspections: Check for and repair any physical damage, loose connections, or exposed wires.
- Monitoring Performance: Keep track of the panel’s output to identify any significant changes that might indicate issues.
Final Installation and Connecting to the Grid
The final stage of building your solar panel involves installing it in its designated location and connecting it to your home’s electrical system or a battery storage system. This process requires careful planning and adherence to safety standards to ensure your solar panel functions effectively and safely.
Connecting to the Electrical System
Grid-Tied System:
- For homes connected to the electrical grid, your solar panel can be integrated to offset your energy consumption.
- This requires an inverter to convert DC electricity from the panel to AC electricity used in homes.
- Ensure your inverter is compatible with the grid’s requirements.
Off-Grid System:
- For an off-grid setup, the solar panel will charge a battery system.
- A charge controller is necessary to regulate the charging process and protect the batteries.
- Select batteries that match your energy storage needs.
Installation Steps
Secure Mounting:
- Ensure that the solar panel is securely mounted in its final location, as per the guidelines in the previous sections.
Electrical Connections:
- Run wiring from the solar panel to the inverter (for grid-tied) or to the charge controller (for off-grid).
- Ensure all wiring complies with electrical codes and safety standards.
System Integration:
- For grid-tied systems, connect the inverter to your home’s electrical panel.
- For off-grid systems, connect the charge controller to the battery bank.
Final Inspection and Testing:
- Once everything is connected, conduct a final inspection and test the system to ensure it is functioning correctly.
Conclusion
As we conclude our guide on building a solar panel from scratch, let’s reflect on the key aspects of this rewarding endeavor. This journey has not only equipped you with a functional solar panel but has also provided a rich learning experience in renewable energy technologies. The DIY approach to solar panel construction is empowering, offering a cost-effective alternative to commercial panels, reducing energy costs, and contributing to environmental sustainability. It also allows for customization to meet specific energy needs and space requirements. The project underscores the importance of continuous learning and regular maintenance, encouraging you to keep abreast of advancements in solar technology. Additionally, sharing your experience and knowledge can inspire others to explore renewable energy projects. This journey represents a significant step towards a more sustainable and self-sufficient lifestyle, reflecting a commitment to greener living and a proactive stance against climate change.